There are several ways to do the foundation of the greenhouse. What’s most important is that it’s solid, safe, flat, and won’t give you trouble down the road. Remember, we don’t do dirt work so whatever foundation you leave us is what you’ll have inside your greenhouse. You’ll have to walk on it, put your plants on it, etc., so make sure there are no holes, roots, etc. to trip on.
We need a clear space to work, with at least 1 foot of clearance on the sides and back, and 3’ of clearance on the front. 2’ on each side is much more preferable, but if there is less than 1’ let us know in case there are additional installation costs (it gets much slower and harder to install with less space than that to work in).
We do not require power, water, or anything else to do the installation; our tools are fully battery powered. You can bring your hose and cord in to plug the fans in after we’re gone, it’s simply a matter of plugging in the cord and screwing in a water hose.
We bring the greenhouse in a 4x4 Toyota Tundra with a 16' custom trailer on the back of it, so we can get in most places with a reasonable driveway or field access. Ideally we like to be able to pull up next to the site, but if necessary we can carry the parts some distance to assemble in a back yard, provided there is a clear path to the greenhouse site. If we have to carry the parts an excessive distance (more than 150') there may be an additional labor charge, so let us know if that's the case so we can allow more time.
We bring the greenhouse partially assembled and finish the assembly on site, so we can pass through fairly narrow areas, such as a walk-through gate in a chain-link fence (see picture below left). However, if the gate has a top on it like the other picture at right, we may not be able to fit through there (we require 8' high clearance to carry the ends in). If we have to go over a tall fence or use other creative methods of getting into the back, that adds a lot of work for us and may entail additional labor charges.


WHERE TO LOCATE YOUR GREENHOUSE
Short answer, it doesn’t matter very much. You want a place that gets at least some sun, preferably morning sun over afternoon sun. The greenhouse is clear on all sides, so which side faces which direction doesn’t really matter much.
It needs to be out of reach of large farm animals (cows in particular) because they can and will rub, poke, and prod it until something breaks (because that’s what cows do). So if you must have it in a field, make sure it’s fenced off.
The direction of the airflow from the fan is in the front door, out the back wall; so facing the door south (or away from prevailing cold winds) has a small effect on minimizing cold air pass-through.
If possible, it’s nice to locate it near a building of some kind to provide shelter from the worst of the winds, although that’s not strictly necessary.
But by far the biggest factor in location is choosing a place that’s convenient for you, not far from wherever you keep your plants, and close enough for power and water to reach.
GRASS SLAB
The easiest prep, which is what most of our customers do, is simply find a reasonably flat spot of dirt/grass, and we can build right on top of that. No prep is needed for most backyard/field installations.
The site doesn’t need to be perfectly level, but it should be free of major humps or holes. If you can walk on it, I can build on it, but the flatter it is, the nicer the greenhouse will look. If the greenhouse appearing level is important to you, then the slab must be perfectly level; otherwise, it doesn’t matter as long as it’s flat.
One quick way to check flatness is to take a long board and lay it on the ground; if it fits the ground fairly snug, it’s fine. If you can fit more than the width of your hand under it anywhere (about 5”), you might consider doing some leveling before we arrive.
We do bring small blocks (2x4 chunks, etc.), but they are small so we are limited to about 2-3” of “leveling” to make the greenhouse flat. If more than that is needed, it should be done well before we arrive.
Please do not spray weedkillers, as we have to spend a lot of time on the ground in contact with it, and we’ve gotten sick from that in the past. The weedblock does a good job of killing whatever’s under there, and whatever it doesn’t kill, you can spray later.
DIRT SLAB
If your site is not level, prone to flooding, or for some other reason you want to prepare a dirt slab, that’s also quite common but remember… MAKE IT AT LEAST 2 FEET BIGGER THAN THE GREENHOUSE! At least half of the dirt slabs we see are too small, and the greenhouse hangs over the edge, which is bad for the greenhouse and makes more work for you later.
So if you get a 10x12, make the slab at least 12x14, and 14x16 wouldn’t be terrible. Again I recommend checking flatness with a 2x4 to see how flat it is; level doesn’t matter much, but it needs to be fairly flat or you’ll have more work to fill in under the gaps later.
Remember, all we do on top of this dirt is put down weedblock, which is a thin plastic fabric similar in feel to a heavy tarp. So you’re creating the surface you’ll be walking on later, so try to make it reasonably smooth so you won’t trip.
You won’t have time to do any of this once we arrive, as putting the weedblock down is our very first step, so get it ready early.
TYPE OF SOIL FOR BASE
Really any type will work; ideally you want something that packs well, drains well, and is cheap. Sandy clay is one good type, but really it doesn’t matter. Avoid heavy clay and, for deep bases, avoid pure sand. Otherwise whatever is available.
If desired, you can put a layer of gravel above the other base, but we don’t recommend a deep, pure gravel base because gravel doesn’t hold anchors well, is expensive, and is unnecessary. 2” of gravel is more than enough for good drainage, and can be put on top of whatever base material you want to use.
DIRT SLAB INSIDE RETAINER
Some customers build a retaining wall area out of lumber/railroad ties and then backfill with sand. This is a nice solution, but either make it bigger than the greenhouse by 6-12” on each side, so we can drive our stakes into the sand, or else make sure the wood frame you build is anchored so we can screw directly to it to anchor it.
Also, remember that the door opens out – so if your ground slopes away uphill in front of your slab or retaining wall, the door might not be able to open properly – so always make sure it’s flat at least 3’ in front of the greenhouse as well.
WOODEN DECK
One very nice way to do a floor is to create a wooden deck (or mount the greenhouse on an existing wooden deck). For this, we recommend making it the exact width of the greenhouse but making it 3’-4’ longer than the greenhouse (so for a 12x16 greenhouse you’d make a 12x20 deck).
The reason for this is that the 3’ wide door opens outward and you’ll want to stand in front of it, at the same height as the greenhouse, to open the door, get out of the way, and enter the greenhouse. It’s also a nice porch to put a few plants or decorations outside the greenhouse.
If you use a wooden deck, we will use wood screws to attach the greenhouse directly to the wood; so it’s recommended that the corners of the deck are concreted into the ground to anchor it (though this isn’t necessary if the deck is really large or heavy, or the greenhouse is in a sheltered location).
NEW CONCRETE SLAB
By far the best foundation for the greenhouse is a concrete slab. Of course it’s also the most expensive. If you decide to go this route, we have these charts that show the location of the power and water hookups, and the exact dimensions of the greenhouse; just choose the size you’re interested in:
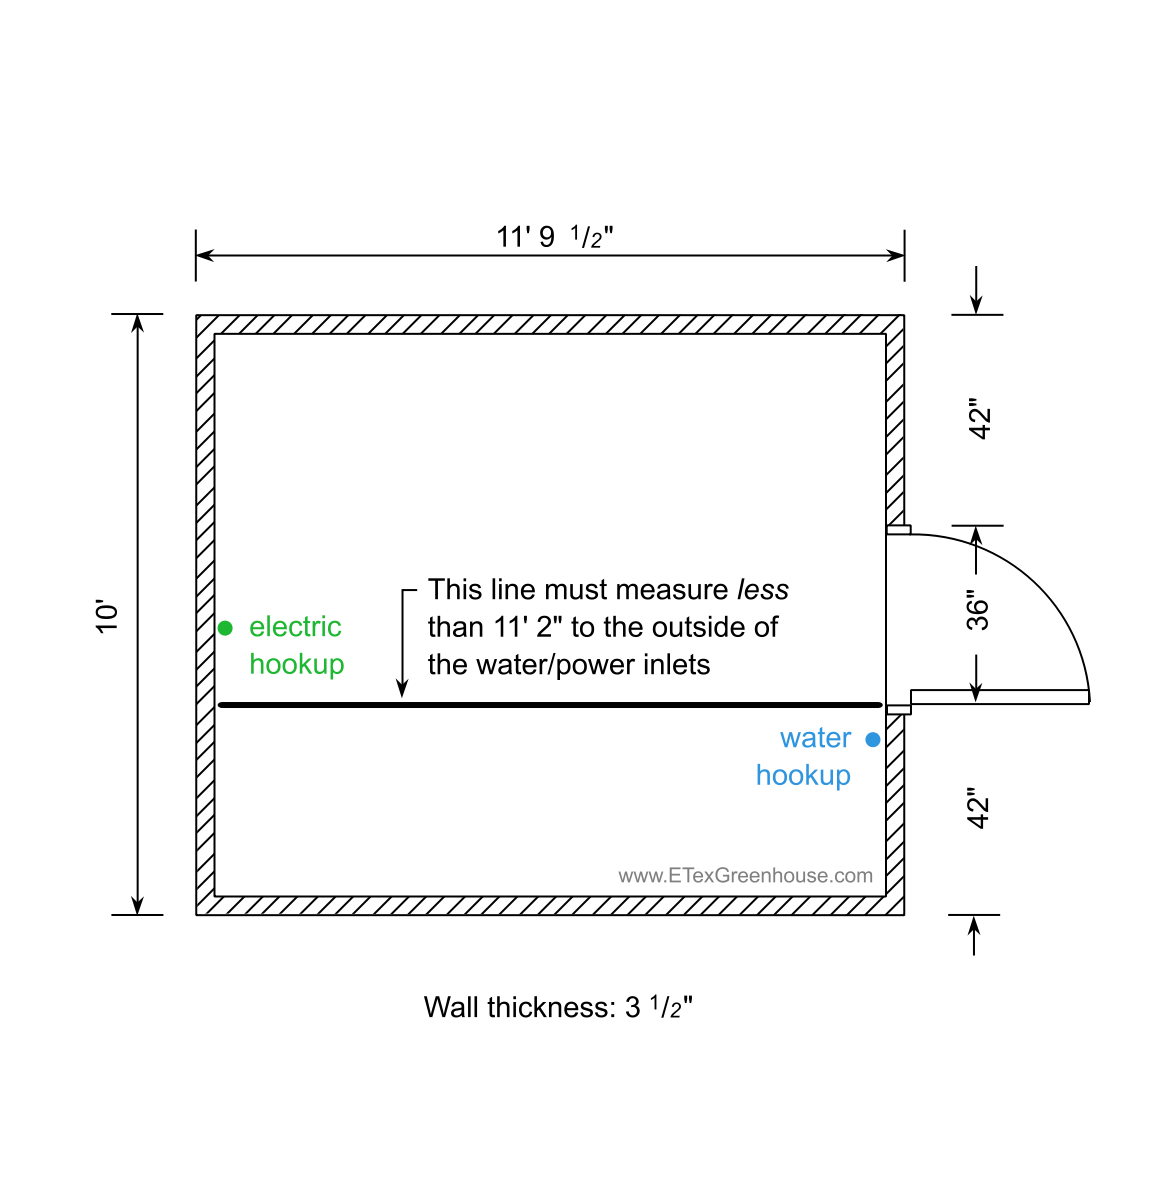
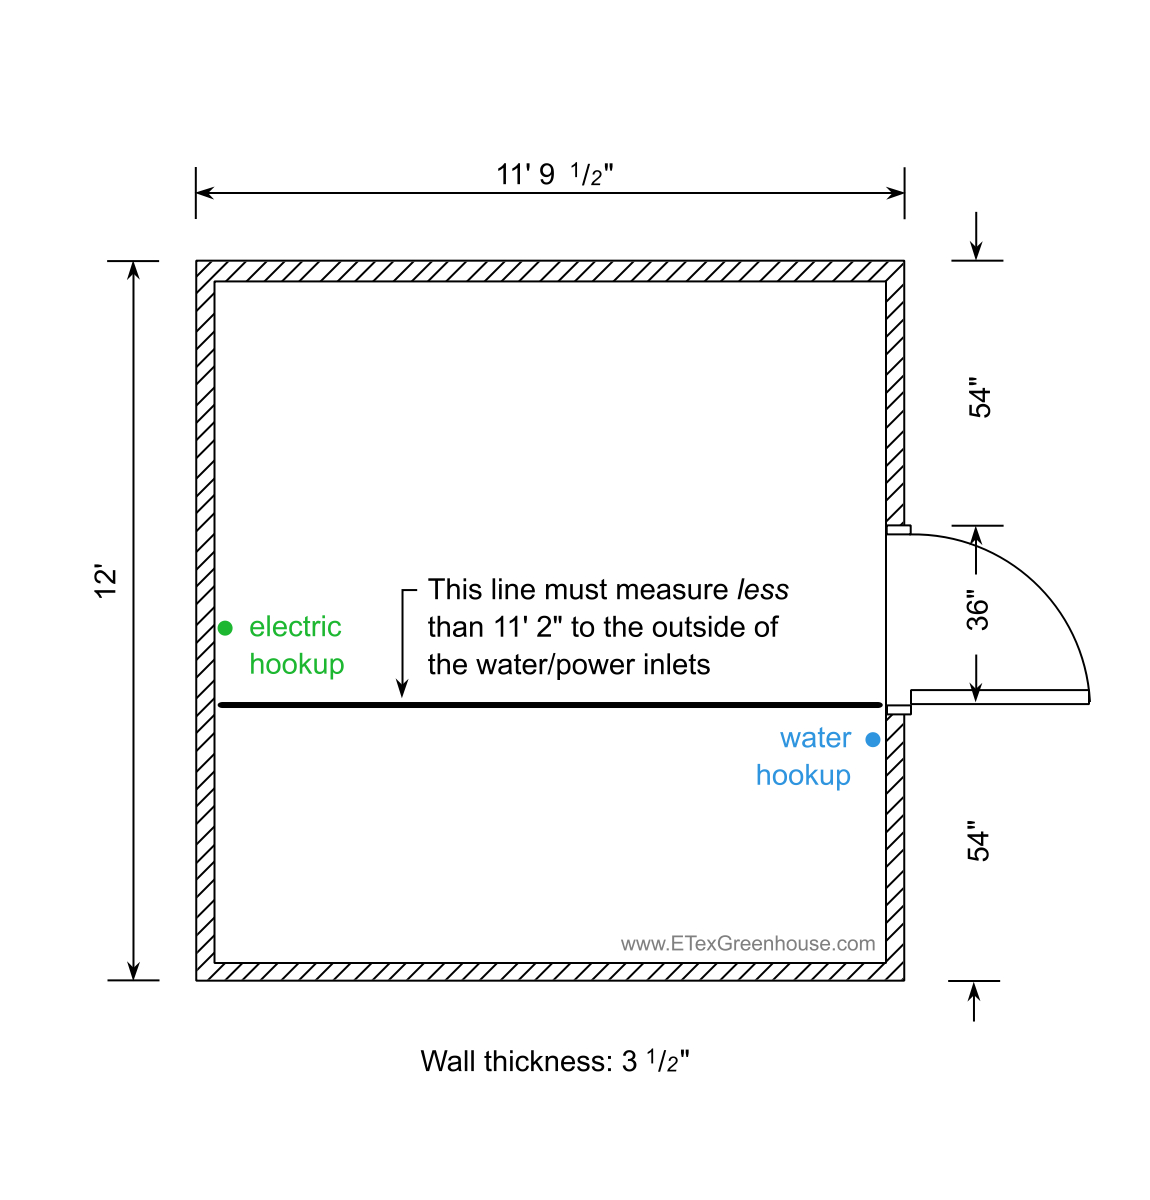
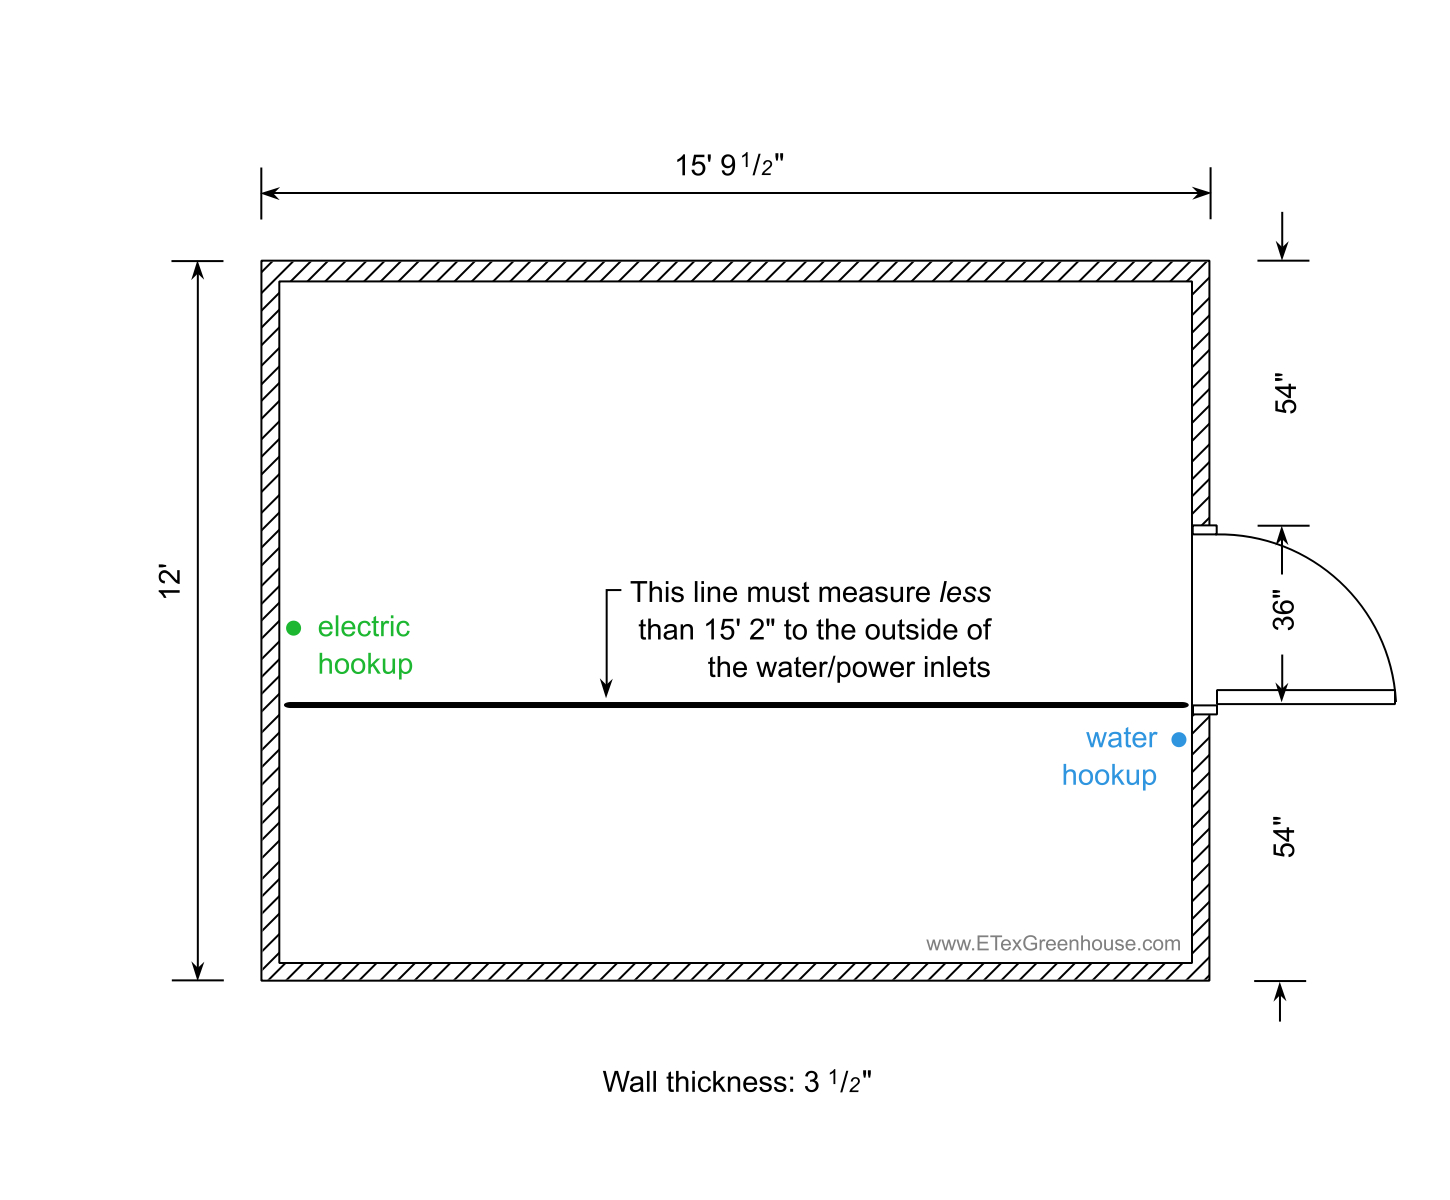
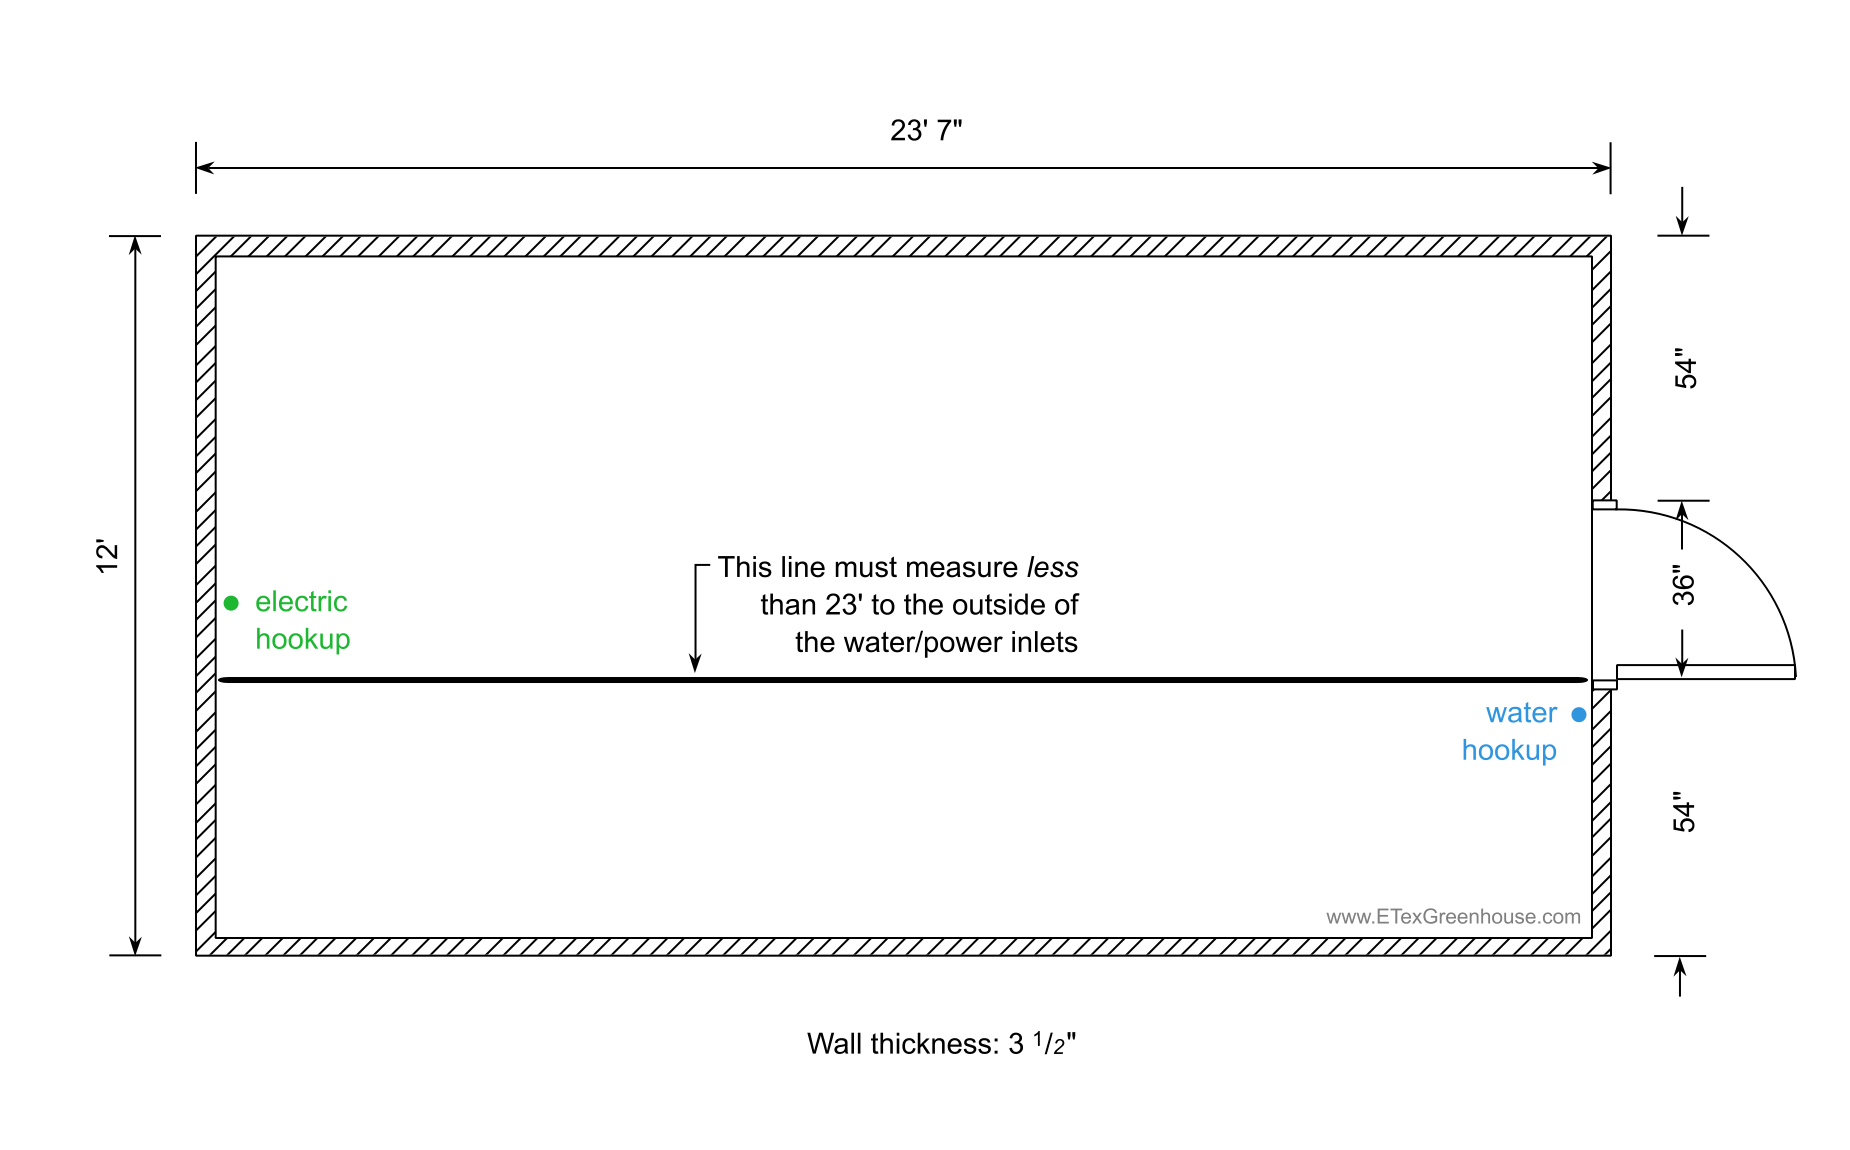
Give this drawing to your concrete guy and he should be able to get it built for you. Do make sure that the distance between the power/water inlets is not greater than the measurement given on the drawing; otherwise, it will hit the baseboard of the greenhouse and require notching which is not ideal. So always double check this before/as the concrete is poured.
One thing you need to make sure of, if you build a slab to these exact measurements: it is very important that it is square. At least half the concrete slabs we work on are out of square by at least an inch or so, and I’ve seen some that were seven inches out of square, which makes it really hard to put a greenhouse on there.
If you have any doubts, or if you don’t trust your contractor, before the concrete is poured, simply measure from the inside of the forms from corner to corner; the measurement should be exactly the same in both directions. If it’s off by more than an inch, bring it to their attention and insist they fix it.
Power and water supply being brought in through the slab is optional but highly recommended. The locations we need the power/water at is indicated in the drawings above; you can bring it in wherever you like, but this is where you’ll be using it.
It is possible to pour a flat slab with no power or water connections and bring the hose and cord in through the wall of the greenhouse, but it’s much nicer if it’s already inside. At the very least, if you’re pouring a new slab, I would recommend installing a 1.5” PVC sweep elbow into the concrete that reaches inside of the baseboard (3.5” in from the wall) to allow pulling a water hose and extension cord inside the slab later. This way you can pull the water/power inside without going through the wall of the greenhouse.
One optional feature that you might like to add is a drain in the middle of the greenhouse. You will be watering your plants regularly, and occasionally you will have puddles and such form, and while those can eventually find their way out of the greenhouse around the base, the best way is a simple drain that leads outside the slab.
For anchoring, we will drill holes into the concrete and install concrete anchors as we’re doing the install. These hold very well, and we’ve never had one come up with our anchors installed. Please DO NOT use J-bolts in the slab; if you feel you must, please contact us first to discuss. In any case, if J-bolts are present it costs us a lot of extra time, and there will be an extra installation charge. [1]
Also, do not notch or bevel the concrete in the door area.There is a 2x4 baseplate all the way across the front of the greenhouse, including the door area, and it needs a base to rest on.
EXISTING CONCRETE SLABS/ASPHALT
We can build on existing concrete slab. It’s not necessary to do any prep or bring power/water in through the slab; that can all be done through the side of the greenhouse when necessary.
Just make sure the slab is clean, has no old bolts sticking up or parts of previous buildings attached to it (yes, I have to say this); otherwise there may be additional charges for cleaning up the slab.
We will anchor by drilling into the concrete and driving in anchors, as with new slabs, or in the case of asphalt, by drilling through it and driving our regular soil anchors.
CONCRETE FOOTERS
A good compromise between the anchoring and strength of concrete while saving money is to pour a concrete footer. It must be no less than 6” wide, and 10-12” is recommended. You can download the true dimensions of the greenhouse from the links above.
Like with regular concrete slabs, it’s very important that it’s square, so always measure corner-to-corner and make sure the measurements are the same in both directions before installation.
Also, the footer must go all the way around the greenhouse, including the door area. There is a 2x4 baseplate all the way across the front of the greenhouse, including the door area, and it needs a base to rest on.
Also it's recommended to bring power/water in if you're going to go this route; if not, at least put a 1.5" or larger PVC pipe through the wall of the footer so you can easily feed your power/water in under the greenhouse.
WOODEN/CINDER BLOCK FOOTERS
The greenhouse is all treated lumber designed for ground contact, so there is no real reason to build it on an elevated footer with railroad ties or 6x6s, etc. We can build on top of such a footer, but we discourage it.
We do not recommend cinder block, landscape blocks, brick, etc footers to go under the edge of the greenhouse; I have yet to see one that is flat, level, or straight, and there is no benefit to the greenhouse by being up on one.
In addition, the added height will make it difficult or impossible for us to anchor with our stakes, as it will be too far off the ground for them to reach effectively.
So in both of these cases, if you want to use cinder blocks or timbers for your base, use it instead as a retaining wall, for a slab at least 2 feet larger than the greenhouse, backfill inside with soil/gravel before we arrive, that way we have plenty of space to anchor and square the greenhouse.
AFTER THE INSTALLATION
Inside the greenhouse you’ll have a weedblock floor; this is industrial grade greenhouse fabric and can take foot traffic more or less indefinitely. However, you can also cover it with gravel, wood chips, brick pavers, stones, volcanic rock, etc.
Obviously, if you are going to add some sort of rock filler on top of the weedblock, it’s not as important to level out all the holes/humps in the slab, as long as it’s flat enough for us to build on it. In any case, you’ll generally wait until after we’re gone to backfill the inside, no higher than the level of the wood footer (1.5”).
Other than that, you’ll just have to bring in your water and electric (if it’s not already inside) and plug in your fan and misting system, program the misting system timer, and start moving your plants in.
You will also need to bring your heater and/or thermometer in (these are not supplied by us) and, depending on the season, you may want to buy/install shadecloth; but typically you won’t do that right after the installation as most installations are done in the fall/winter, and most people won’t need shadecloth until spring.